This guide uses Perzo, our Shopify app, for the personalization steps. The advice on products, pricing, photos and fulfillment applies whatever tool you use.
In short
- Pick one or two products you can print well, such as a framed print and a mug.
- Price each one from your costs: print cost + shipping + personalization cost + your margin.
- Create the product in Shopify, then add Perzo and a pet portrait style.
- Test the style on real pet photos before any shopper sees it.
- Tell shoppers what kind of photo to send.
- Download the print file from each personalized order and send it to your printer.
- For the holidays, set your own order-by date from your production and shipping times.
1. Choose your products
Start small. One wall product and one gift product are enough to learn what your shoppers want.
- Framed prints and canvases. A vertical print area usually suits a single sitting pet; check it with your shoppers’ photos.
- Mugs. The art wraps around the mug, so keep the handle out of the print area.
- T-shirts, hoodies and totes. The fabric’s folds and texture show through the print. Look at the style at the size it will be printed.
- Pillows, puzzles, posters and tiles. Other flat, perspective, cylindrical or fabric products can use a custom mockup.
Before you list a product, order a sample from your printer. You will see the real colors and size, and you will have photos for your listing.
To show shoppers their art on the product, set up a mockup: a photo of the blank product. Without one, shoppers see the artwork itself. Shoot the photo straight on, in even light, with nothing in the print area. If you work with a print-on-demand provider, check its print area first, so the print size you set in Perzo matches it.
2. Price it from your costs
There is no standard price for a custom pet portrait. Work from your own numbers:
Price = print cost + shipping + personalization cost + your margin
- Print cost: what your printer or print-on-demand provider charges for the product, frame or canvas included.
- Shipping: what you pay to ship it, or the part of it you include in the price.
- Personalization cost: Perzo bills per generation. Each plan includes a number of generations a month, and one generation is one AI art creation, whether or not the shopper buys. A shopper may create several versions before buying, and some won’t buy, so estimate this cost per order from your own numbers once you have them.
- Margin: what the product must earn after all of the above, and after Shopify and payment fees.
Current Perzo plans:
- Starter$19.00 a month, 60 generations included, $0.39 per extra generation
- Growth$49.00 a month, 200 generations included, $0.29 per extra generation
- Pro$99.00 a month, 500 generations included, $0.19 per extra generation
- Scale$299.00 a month, 2,000 generations included, $0.14 per extra generation
- Custom5,000+ generations a month, priced with you
You control the personalization cost: set how many versions a shopper can create per session, and keep extra generations off, or on under a monthly cap. Price the personalized product above the plain one: the art is part of what the shopper buys.
3. Set up the product in Shopify
Create the product as you would any other: title, photos, description and a variant for each size or finish. For pet portraits, also:
- Say what the shopper gets: the product, the size, and that the art is made from their photo in your style.
- Show examples of your style on the product photos.
- Put your photo tips in the description (see step 6).
- State your production time and, in season, your order-by date.
Perzo works with Online Store 2.0 themes whose product page accepts app blocks, such as Dawn. Older (vintage) themes are not supported yet.
4. Add Perzo and create your pet portrait style
Install Perzo from the Shopify App Store and open it in your Shopify admin. Then:
- Add the product in Perzo: its print size, bleed, minimum DPI and the Shopify variant it sells.
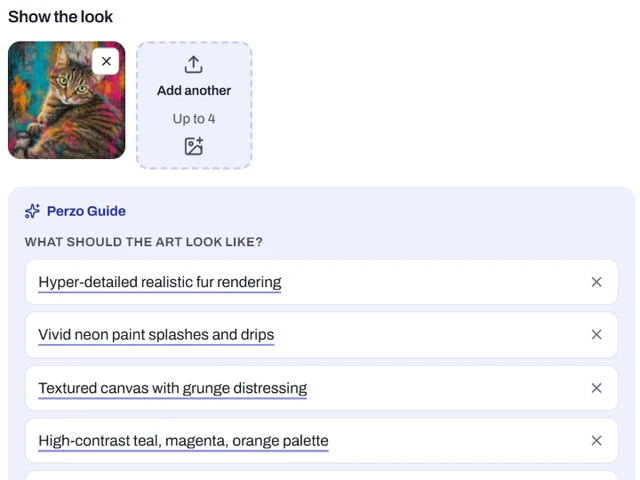
- In AI styles, click New style. Name it (shoppers see the name) and upload one to four examples of the finished look you sell. Use images you have the rights to.
- Perzo Guide reads the examples and describes the style as short points you can edit: what the art should look like, what to avoid and what to always keep. For pets, points such as the markings and eye color are worth keeping; check them in your tests.
- Or start from a ready style and adjust it.
- In Mockups, pick the product type and place the print area on a photo of your blank product, so shoppers see the art on it.
- Publish the style, choose the products that offer it, and add the Perzo block to the product page in the theme editor.
5. Test before shoppers see it
Use Test on sample photos with the photos your shoppers will really send, not only your best ones:
- different breeds, coat colors and lengths, including very dark and very light coats;
- cats as well as dogs, if you will sell both;
- close-ups and full-body shots, indoor and outdoor light;
- two pets in one photo, if you will accept them.
Look at each result as a buyer would: is it clearly their pet? Then refine the points and test again. Each saved change creates a new version; you can compare results and roll back. Publish when the results hold up.
Check the art on each mockup too. The print file is made at the product’s print size and checked against its minimum DPI.
Keep your test photos. When you change the style later, test the new version on the same photos and compare it with the old one before you publish it.
6. Tell shoppers what photo to send
Photo quality can affect the result; consider sharing these submission guidelines in your product description:
- One pet, with the face clearly visible and the eyes in focus.
- Daylight, near a window or outdoors in shade. No flash.
- Shot at the pet’s eye level, not from above.
- The pet fills most of the photo.
- No heavy filters, hard shadows or anything covering the face.
- The original photo, not a screenshot or a photo of a printed photo.
In the wizard, Perzo frames the photo to your print shape automatically; shoppers can adjust the crop, zoom or rotation, and see a tip to zoom out or use a sharper photo when the framing is small.
7. Approval and fulfillment
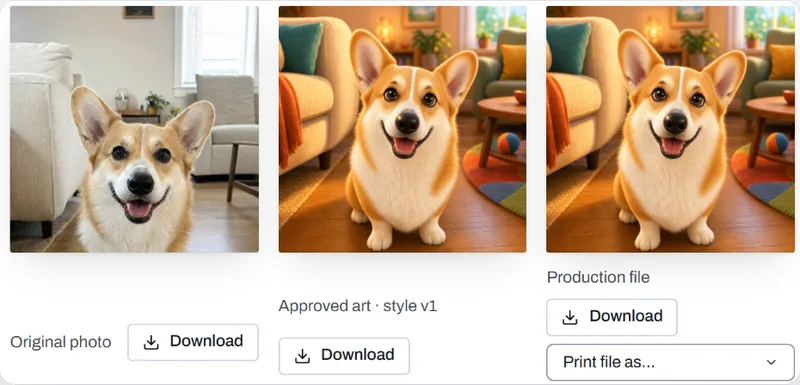
The shopper sees the portrait (on your product, when a mockup is set up), can create another version or try another style within your limits, and adds the one they like to the cart. That exact image is approved and will not be changed or recreated.
Each linked personalized order appears in Perzo with the original photo and the approved art, and its production file is prepared there. Download the file (PNG, JPEG, PDF or TIFF) and send it to your printer or print-on-demand provider with the order details. Files stay available for the retention period you set. Perzo has no direct print-on-demand integrations yet, so this step is manual.
Previews carry a watermark by default; the print file does not.
8. Plan for the holidays
If you sell pet portraits for the holidays, plan the season before it starts:
- Set your own order-by date from your production time, your shipping times and your printer’s holiday cutoffs, and show it on the product page.
- Order samples and test your styles well before the holiday rush.
- Consider a seasonal style, and the seasonal products your printer offers.
The deadlines are yours: Perzo does not show shoppers shipping or delivery dates; its production-day setting only powers your internal due date.
Next: see how Perzo works for pet portraits, or what a photo-to-art Shopify app does.